
The camping season is over, and it’s time to put your camping gear away for the off-season. This is the perfect opportunity to clean, sort, and maintain your outdoor adventure treasures so they are not only ready for the start of next season, but so that you extend the life of your gear – often adding years to their life with proper off-season care.
It’s time to invest in a couple of totes. I like clear plastic bins so I can see what’s inside, but many people suggest opaque ones to avoid UV light which can damage your gear.
We’ll take a look at steps to care for your camping gear along with some suggested tools to make that job easier. Ready? Time to haul your stuff out of the corner of the garage you tossed it in when you got back from that last trip. This is gonna be fun!
1. Tents and tarps
As one of the most expensive pieces of camping gear in your kit, winterizing your tent should be a priority when it’s time to pack up for the season. Most tents have 3 pieces: tent body, rainfly, and footprint.
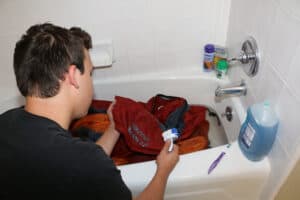
- Knock off any loose dirt or dried mud. Sweep out the inside. Check to make sure you didn’t leave a stray chapstick in a side pocket or dirty socks in a corner last time you packed up. This is the ideal time to see if there are any repairs needed, too.
- Gather what you need to wash your tent. For this, the best tools are a sponge, some mild dish soap, tent cleaner, cool water, and a big bucket, tub, or utility sink.
- Spot clean your tent with dish soap and the sponge for extra-dirty areas, both inside and out.
- Mildew, mold, pet stains, and rank odors call for deep cleaning with an enzyme odor product like Gear Aid Revivex. Make sure you pay attention to the suggested soak time so you don’t ruin the waterproof coating on your tent.
- Pine sap calls for mineral oil or alcohol-based wet wipes. But don’t over scrub. Make sure you spot clean with dish soap to get the oil or alcohol out.
- Open all the zippers and turn your tent inside out.
- Fill the tub with cool water and add tent cleaner. I like Nikwax Tent & Gear Cleaner since it combines cleaning with waterproofing and UV protection all in one step.
- Soak the tent and rainfly together. You probably want to soak the footprint by itself since that will probably be dirtier than the tent body and rainfly. You can gently rub dirty areas with your sponge, but be careful of scrubbing too hard since you don’t want to damage the material of your tent.
- Use a toothbrush to scrub dirt and sand out of the zippers, but be careful not to scrub the surrounding tent material to avoid damage.
- Rinse the tent, draining and refilling the tub until all the soap is off. You will probably have to do this several times.
- Let the tent drip dry. A plastic hanger is the perfect tool for this, one for each component of the tent. You can either let them drip over the tub or hang them outside in nice weather. Make sure you adjust the drape of the tent over the hanger several times to let dry evently.
- Once the majority of the water has had a chance to drain off, you’ll need to let dry it completely.
- The easiest way to completely dry your clean tent is to set it up outside on a sunny day. If that’s not possible, drape it over a chair or sofa, turning it often to let the air flash off any dampness.
- Make sure it’s dry. Did I mention it needs to be dry?
- It’s best to store your tent in a larger storage bag than the stuff sack so it’s not compressed for months on end. Ditty bags work great for this and come in a variety of sizes.
- But make sure it’s dry before you store it.
- Seriously. Dry.
2. Sleeping bags
At the end of every camping season, you should wash your sleeping bag before storing it. It may not look dirty, but think about all the sweat, sunscreen, bug spray, campfire smoke, and just plain dirt dirt that came into contact with your bag over the course of your camping trips. Yuck!

- Use a front-loading washer only. If you don’t have one, then borrow a friend’s, or spend an afternoon at the laundry mat. (Bring along a good book to make the time go faster. Wild is a great choice.)
- Use gentle detergent and the gentle cycle to protect baffles from getting damaged. For down sleeping bags, I suggest Nikwax Down Wash (great for your down sweaters, too). For synthetic bags try Nikwax Tech Wash. (Use this on your rain jacket and stuff sacks, too.)
- Dry your sleeping bag on low or no heat with a couple of clean tennis balls to fluff the filling and a clean towel to reduce static electricity.
- After drying, you should hang your bag for a day or two to make sure all the moisture is out before you store it. I like to use a pant hanger that’s open on one side. I slip this in at the bottom of the zipper. You can actually store your sleeping bag all winter like this if you have the closet space to do so.
- After your bag is completely, absolutely, no-question, bone dry, then you can store it. But not in its stuff sack. That will crush the insulation and you will lose years of life on your sleeping bag. Instead, pick up either a mesh storage sack or a cotton storage sack. Stuff your sleeping bag in one of these roomy sacks for the best results.
- You can hang the bag from a hook on the garage wall, or store it in a plastic bin to keep moisture out over the winter.
3. Sleeping pads/air mattress
The best way to clean your sleeping pad is with the sponge and soap from your tent project above. Spot clean with a small amount of dish soap. Use a soft toothbrush for any hard-to-clean stains. Rinse it off well, then hang it until it’s dry. Avoid immersing your sleeping pad completely in water.
4. Furniture
Tables
Wipe dirt and food stains off your camp table with a non-abrasive cloth or sponge. Dry completely and store in the stuff sack or box it came in.
Chairs
Sponge clean your camp chairs with warm soapy water. Pine sap can be scrubbed off with mineral oil, and food or oily stains can be spot cleaned with Simple Green. Just make sure you wash with mild dish soap after spot cleaning the tough spots. Rinse well and allow to dry completely. Store in a dry place.
5. Lights
Flashlights, headlamps, & other electronic devices
Remove the batteries from flashlights or headlamps so you don’t have leakage and corrosion which can damage the devices. You should start with new batteries for next season, anyway. Don’t want to throw away your partially used batteries? Stash them in a Ziploc bag until it’s time to start camping again.
Lanterns
White gas lantern? Follow the instructions for stoves below. Battery-powered lantern? Follow the instructions for flashlights above.
6. Dining
Stoves
For two-burner camp stoves, remove the burner assembly and then wash with soap and water. For both backpacking stoves and the burner assembly of the camp stove, empty your white gas stove reservoir, using the fuel to soak a cotton rag. Disassemble and wipe the stove parts with the rag. Check the gaskets for creases or tears then, and replace them as needed. Reassemble before storing.
Coolers
Wash insulated coolers with dish soap and warm water. Dry completely before storing. Store with the plug unstoppered so they don’t smell funky next time you get them out.
Cookware
Pots and pans can take a beating in the campsite. It’s not just food that didn’t get completely cleaned off at camp. Soot stains and fire scorch marks come off with a brillo pad and some elbow grease. If this is “camp only” cookware, then store in a sealed plastic bag or storage box to make sure they are ready for next season. If they are part of your regular kitchenware, then put some extra elbow grease in to keep your marriage sweet.
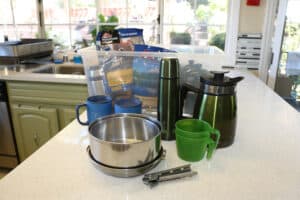
Water containers
Drain and rinse with a diluted bleach solution; 1 tablespoon in a gallon of water. Leave the top slightly ajar to avoid a sour smell next spring.
Dishes and utensils
If you have a set just for camping, then after washing them, store them in a large Ziploc bag in your camping storage bin.
7. Packs
Backpack
- Wash your backpack in the bathtub with a soft scrub brush and mild dish soap. Make sure you get the inside of each pocket. You never know if there is a partially eaten energy bar languishing in the bottom of one of them.
- Use a toothbrush on zippers. If any stick, apply a little silicone grease.
- Hang to dry.
- Check your gear clips for any broken or cracked ones. If you find any that need to be fixed, order replacements now so you have time for shipping before you want to head out again.
- You can store in a plastic bin or hanging in a closet or garage.
Daypack
The most important part of prepping your daypack for winter storage is to empty and clean the water reservoir.
- Empty the water out, then gently scrub the inside with a soft brush and diluted bleach solution (1 tablespoon of bleach to a gallon of water).
- Use a toothbrush for the screw caps or zip closures.
- Drain and hang the bladder. I like to use a coated metal hanger, bent to slide into the mouth of the reservoir. This keeps the sides from touching which makes sure the bladder dries completely.
- The pack itself can be cleaned just like the backpack above.
8. Misc camp gear
Paper goods
Toss your half-used paper towels and toilet paper. Seriously, you want to start fresh next season.
Water purifier
- Dismantle your water purifier and soak the parts in a bucket of diluted bleach solution (1 tablespoon bleach to 1 gallon of water).
- Use a toothbrush dipped in your bleach solution on ceramic filters.
- Some people suggest storing your purifier in the freezer, but this can crack the filter, so after rinsing and allowing it to air dry, I’d suggest storing it in a Ziploc bag in your camping storage bin.
Sunscreen
Sunscreen tends to separate, but it stays good for three years (according to the FDA) so you can save it from year to year. If it does start to separate, then just shake it really well before using it to avoid a mess. But make sure you store it away from the rest of your camping gear. It’s greasy and can damage your other camping stuff if it leaks.
Bug spray
Bug spray is another one of those things that can wreak havoc on your clean camping gear. Remove it from your gear storage area, put it in a Ziploc inside another Ziploc, and save it for next season (again, for up to 3 years).
First aid kit
This is the perfect time to review what you’ve used over the season and refill what you need. Band-Aids, packets of Neosporin, alcohol wipes, gauze. Make sure your first aid kit is all set before you stash it in your camping storage bin for the winter.
Conclusion
While it’s always sad to see the end of camping season, maintaining your camping gear and storing it properly means that when you take it out for the new season, it’ll be ready to head out on the trail with you, just like old friends.
